Operation Biting
| Operation Biting | |||||||
|---|---|---|---|---|---|---|---|
| Part of the British raids during the Second World War | |||||||
 Bruneval photographed in December 1941 by the RAF, with its Würzburg radar at left | |||||||
| |||||||
| Belligerents | |||||||
|
|
| ||||||
| Commanders and leaders | |||||||
| John Frost | Unknown | ||||||
| Units involved | |||||||
| Unknown | |||||||
| Strength | |||||||
| ~130 men[3] | |||||||
| Casualties and losses | |||||||
| |||||||
The radar installation | |||||||
Operation Biting, also known as the Bruneval Raid, was a British Combined Operations raid on a German coastal radar installation at Bruneval in northern France, during the Second World War, on the night of 27–28 February 1942.
Several of these installations were identified from Royal Air Force (RAF) aerial reconnaissance photographs during 1941, but the purpose and the nature of the equipment was not known. Some British scientists believed that these stations were connected with successful German attacks on RAF bombers conducting bombing raids against targets in Occupied Europe, resulting in severe losses of pilots and bombers. The scientists requested that one of these installations be raided and the technology it possessed be studied and, if possible, extracted and brought back to Britain for further examination.
Due to the extensive coastal defences erected by the Germans to protect the installation from a seaborne raid, the British believed that a commando raid from the sea would suffer heavy losses and give sufficient time for the enemy to destroy the installation. Officials decided that an airborne assault followed by seaborne evacuation would be the most practicable way to surprise the garrison of the installation, seize the technology intact, and minimise casualties to the raiding force.
On the night of 27 February, after a period of intense training and several delays due to poor weather, a company of airborne troops under the command of Major John Frost parachuted into France a few miles from the installation. The main force assaulted the villa in which the radar equipment was kept, killing several members of the German garrison and capturing the installation after a brief firefight.
An RAF technician with the force dismantled a Würzburg radar array and removed several key pieces, after which the force withdrew to the evacuation beach. The detachment assigned to clear the beach had initially failed to do so, but the German force guarding it was soon eliminated with the help of the main force. The raiding troops were picked up by landing craft, and transferred to several motor gunboats, which returned them to Britain.
The raid was entirely successful. The airborne troops suffered relatively few casualties, and the pieces of the radar they brought back, along with a captured German radar technician, allowed British scientists to understand enemy advances in radar and to create countermeasures to neutralize them.[7]
Background
[edit]After the end of the Battle of France and the evacuation of British troops from Dunkirk during Operation Dynamo, much of Britain's war production and effort was channelled into RAF Bomber Command and the strategic bombing offensive against Germany. However, bomber losses on each raid began to increase during 1941, which British intelligence concluded was due to German use of advanced radar equipment.[8]
The British and Germans had been competing in radar technology for nearly a decade at this point, with the German technology often at the same level as the British or surpassing them due to heavy investment in the fledgling technology.[9] By the beginning of the Second World War, Britain had devised effective radar systems, primarily through the work of Robert Watson-Watt, although much of the technology was still rudimentary and Watson-Watt and other scientists had failed to devise an effective night-defence system in time for the German night-time bombing of Britain during 1940.[10]
Another British scientist working on radar systems and techniques was R. V. Jones, who had been appointed in 1939 as Britain's first scientific intelligence officer, and had spent the first years of the conflict researching how advanced German radar was in comparison to Britain,[11] convincing doubters that the Germans had radar.[12]
By examining leaked German documents, crashed Luftwaffe bombers and Enigma decryptions, and through German prisoner of war interrogations, Jones discovered that high-frequency radio signals were being transmitted across Britain from somewhere on the Continent, and he believed they came from a directional radar system.[13] Within a few months of this discovery, Jones had identified several such radar systems, one of which was being used to detect British bombers; this was known as the "Freya-Meldung-Freya" array, named after the ancient Norse goddess.[14]
Jones was finally able to see concrete proof of the presence of the Freya system after being shown several mysterious objects visible in reconnaissance pictures taken by the RAF near Cap d'Antifer in Normandy – two circular emplacements in each of which was a rotating "mattress" antenna approximately 20 ft (6 m) wide. Having found proof of these Freya installations, Jones and the other scientists under his command could begin devising countermeasures against the system, and the RAF could begin to locate and destroy the installations themselves.[14]
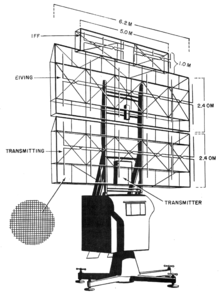
Jones also found evidence of a second part of the Freya set-up, referred to in Enigma decrypts as "Würzburg", but it was not until he was shown another set of RAF reconnaissance photographs in November 1941 that he learned the nature of Würzburg. The Würzburg radar device consisted of a parabolic antenna about 10 ft (3 m) in diameter, which worked in conjunction with Freya to locate British bombers and then direct Luftwaffe night fighters to attack them.[15] The two systems complemented each other: Freya was a long-range early-warning radar system but lacked precision, and Würzburg had a much shorter range but was far more precise. Würzburg FuSE 62 D, also had the advantage of being much smaller than the Freya system and easier to manufacture in the quantities needed by the Luftwaffe to defend German territory.[15][16]
Prelude
[edit]To neutralise the Würzburg system by developing countermeasures against it, Jones and his team needed to study one of the systems or at least the more vital pieces of technology of which the system was composed. One site had recently been sighted by an RAF reconnaissance Spitfire from the Photographic Reconnaissance Unit during a flight over part of the French English Channel coast near Le Havre.[17]
The site was found on a clifftop immediately north of the village of Bruneval, 12 mi (19 km) north of Le Havre, and was the most accessible German radar site that had been found so far by the British; several other installations were further inland and others were as far away as Romania and Bulgaria.[15][16] A request for a raid on the Bruneval site to capture a Würzburg system was passed on to Admiral Lord Louis Mountbatten, the commander of Combined Operations.[18] Mountbatten, in turn, took the proposal to the Chiefs of Staff Committee, who approved the raid after a brief debate.[18]
Having received permission to conduct the raid, Mountbatten and his staff studied the Bruneval installation and its defences, rapidly concluding that due to the extensive coastal defences in the area around the installation, it was too well-guarded to permit a seaborne commando raid. They considered that such a raid would result in high casualties among the attacking troops and would not be fast enough to capture the Würzburg radar before it was destroyed by the Germans.[19]
Believing that surprise and speed were to be the essential requirements of any raid against the installation to ensure the radar was captured, Mountbatten saw an airborne assault as the only viable method. On 8 January 1942, he therefore contacted the headquarters of 1st Airborne Division and 38 Wing RAF, asking if they were able to conduct the raid. The division's commander, Major-General Frederick Browning, was particularly enthusiastic, as a successful operation would be an excellent morale boost to the airborne troops under his command, as well as a good demonstration of their value.[20]
The two commanders believed that training by airborne troops and aircrews could be completed by the end of February when there would be suitable meteorological conditions for the operation. Training for the raid was begun immediately, but encountered several problems. 38 Wing was a new unit still in the process of formation, so No. 51 Squadron RAF under Wing Commander Percy Charles Pickard was selected to provide the aircraft and aircrew needed for the operation, although Group Captain Nigel Norman of 38 Wing would remain in overall command.[20] Another problem encountered was the state of training of the unit of airborne troops chosen to raid the installation.
During this period, the 1st Airborne Division was composed of only two parachute battalions, of which only one (1st Parachute Battalion), was fully trained. Browning, wishing to keep the 1st Parachute Battalion intact for any larger operation the division might be selected for, ordered the 2nd Parachute Battalion to provide a company for the operation. 'C' Company commanded by Frost was selected but the company had been so recently formed that Frost and many of his men had not yet completed their parachute jumping course.[17]
The level of security imposed on the planning for the raid was so high that when Frost was first briefed by a liaison officer from the headquarters of the 1st Airborne Division, he was informed that his company was to take part in an airborne warfare demonstration for the War Cabinet. He was also informed that C Company would be divided into four sections for the exercise, which was contrary to a plan Frost had devised for the exercise and confused him. It was only after Frost raised several objections with a more senior officer at headquarters that he was informed of the intended raid, after which he dropped his objections and turned his attention to training the company.[21]
Training
[edit]The company spent time on Salisbury Plain in Wiltshire and then travelled to Inveraray in Scotland where they underwent specialised training on Loch Fyne, practising night embarkations on landing craft to prepare the company for evacuation by sea after raiding the radar installation. After this, the unit returned to Wiltshire and began carrying out practice parachute drops with the aircraft and aircrews of 51 Squadron.
Despite the aircrews having no previous experience in dropping parachutists, these exercises proved to be successful.[22] The company's working-up was aided by the creation of a scale model of the radar installation and the surrounding buildings being built by the Photographic Interpretation Unit.[23] During this period, Major Frost was introduced to Commander F. N. Cook of the Royal Australian Navy who would be commanding the naval force intended to evacuate the company after the raid, as well as to the detachment of 32 officers and men from No. 12 Commando who would arrive in the landing craft and cover the company as it withdrew from the beach.[24][25]
Frost also met RAF Flight Sergeant C.W.H. Cox, who had volunteered to accompany C Company for the operation; as an expert radio electronics technician, it would be his job to locate the Würzburg radar set, photograph it, and dismantle part of it for transportation back to Britain.[26] Derek Garrard of Jones' team asked Jones to obtain an Army uniform and identification number for Cox, as he would be the object of special attention from the Germans if he was captured in Air Force uniform, but the War Office were obdurate.[27]
Accompanying the strike force was a 10-man section of Royal Engineers of the 1st Air Troop led by Lt. Dennis Vernon.[28] Six of the sappers would dismantle the radar device whilst four sappers would plant anti-tank mines to protect the force from counter attack.

Information about the Bruneval radar installation was also gathered during this period, often with the help of the French Resistance, without whom detailed knowledge of the disposition of the German forces guarding the installation would have been impossible. This information was gathered by Gilbert Renault, known to the British by the code-name 'Rémy', and several members of his resistance network.[29]
The installation was composed of two distinct areas; a villa approximately 100 yards (91 m) from the edge of a cliff which contained the radar station itself, and an enclosure containing several smaller buildings which contained a small garrison. The Würzburg antenna was erected between the villa and the cliff.[30] The radar station was permanently manned by Luftwaffe radar technicians and was surrounded by guard posts and approximately 30 guards; the buildings in the small enclosure housed about 100 German troops, including another detachment of technicians.[3] A platoon of German infantry was stationed to the south in Bruneval, and was responsible for manning the defences guarding the evacuation beach; these included a strongpoint near the beach as well as pillboxes and machine gun nests on the top of the cliff overlooking the beach. The beach was not land mined and had only sporadic barbed-wire defences, but it was patrolled regularly; a mobile reserve of infantry was believed to be available at one hour's notice and stationed some distance inland.[30]
Based on this information, Frost decided to divide the company into five groups of 40 men for the raid, each named after a famous Royal Navy admiral: 'Nelson', 'Jellicoe', 'Hardy', 'Drake' and 'Rodney'.[22] 'Nelson' would clear and secure German positions defending the evacuation beach, whilst 'Jellicoe', 'Hardy' and 'Drake' would capture the radar site, villa and the enclosure. 'Rodney' was the reserve formation, placed between the radar site and the main likely enemy approach to block any counterattack.[31]
It was considered that the combination of a full moon for visibility, and a rising tide to allow the landing craft to manoeuvre in shallow water, was vital for the success of the raid, which narrowed the possible dates to four days between 24 and 27 February.[22] On 23 February, a final rehearsal exercise took place, which proved to be a failure; despite ideal weather conditions, the evacuation landing craft grounded 60 yards (180 ft) offshore and could not be shifted despite the efforts of the crews and troops.[22]
The raid
[edit]
The raid was postponed for several days after the 23 February rehearsal due to weather conditions, but on 27 February the weather proved to be ideal, with clear skies and good visibility for the aircraft of 51 Squadron, and a full moon which would provide illumination for the evacuation of the raiding force. The naval force under Commander Cook departed from Britain during the afternoon and the Whitley transport aircraft carrying C Company took off from RAF Thruxton in the evening.[25]
The aircraft crossed the English Channel without incident, but as they reached the French coast they came under heavy anti-aircraft fire; however, none of them were hit, and they successfully delivered C Company to the designated drop zone near the installation.[3] The drop was an almost total success, with the majority of the raiding force landing on the edge of the drop zone; however, half of the 'Nelson' detachment landed 2 miles (3.2 km) short of the DZ. Once the other detachments had gathered their equipment and oriented themselves, they moved off to undertake their arranged tasks.[30]
'Jellicoe', 'Hardy' and 'Drake' encountered no enemy opposition as they moved towards the villa housing the radar installation, and after surrounding the villa Frost gave the order to open fire with grenades and automatic fire. One German guard was killed as he returned fire from an upstairs window, and two more were taken prisoner by the airborne troops; upon interrogation, the prisoners revealed that the majority of the garrison were stationed further inland.[32] There still remained a substantial enemy force in the buildings in the small enclosure near the villa, and this now opened fire on the raiding force after being alerted by the initial firefight, killing one of the airborne troops.[32]
The volume of fire rapidly increased, when enemy vehicles could be seen moving towards the villa from the nearby woods; this, in particular, worried Frost, as the radio sets the force had been issued failed to work, giving him no means of communication with his other detachments, including 'Nelson' who were tasked with clearing the evacuation beach. Flight Sergeant Cox and several sappers arrived at this time and proceeded to dismantle the radar equipment, placing the pieces on specially designed trolleys.[33]
Having secured the radar equipment and under heavy enemy fire, Frost gave the order for the three detachments to withdraw to the evacuation beach; it became apparent, however, that the beach had not been secured by the under-strength 'Nelson' detachment when a German machine gun opened fire on the airborne troops, severely wounding the company sergeant major. Frost ordered 'Rodney' and the available men of 'Nelson' to clear the defences, whilst he led the other three detachments back to the villa, which had been reoccupied by enemy troops.[32] (see also chapter in 'Fighting Back' by Martin Sugarman on the role of German Jewish refugee Commando and Paratrooper Peter Nagel aka Newman, on the raid, and reference to the Yorks TV 1977 documentary film on the raid which includes interviews with Frost, Cox, Nagel and other survivors, and another film held by the IWM, London made in 1982)
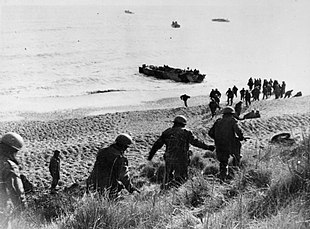
The villa was soon cleared of enemy troops once more, and when Frost returned to the beach, he found that the machine-gun nest had been destroyed by the mis-dropped troops of 'Nelson'; avoiding other enemy positions, they had reached the beach and attacked the machine-gun post from the flank.[34] By this time it was 02:15 but there was no sign of the naval force that was to evacuate the airborne troops. Frost ordered 'Nelson' to guard the inland approaches to the beach and then fired off an emergency signal flare; soon after that, the naval force was seen approaching. The original plan for the operation had called for two landing craft at a time to land on the beach, but this had never been satisfactorily achieved during training; instead, all six landing craft landed at the same time, with the covering troops in the landing craft opening fire on German soldiers gathering at the top of the cliff.[35]
This deviation from the original evacuation plan and the enemy fire caused considerable confusion on the beach; some of the landing craft left the beach over-crowded, whilst others left half-empty. However, the radar equipment, German prisoners and all but six of the raiding force were embarked and transferred to motor gunboats for transport back to Britain. On the return journey, Frost learned that the naval force had received no signals apart from the signal flare, and had spent much of the time hiding from a German naval patrol that had nearly discovered them. The journey back to Britain was uneventful, with the force being escorted by four destroyers and a flight of Spitfires.[35]
The paratroopers lost two killed, eight wounded and six men who did not return to the boats. They were later taken prisoner by the Germans.[36] German reports were found after the war, which made the German loss as follows: the army: two killed, one seriously wounded, two missing. Luftwaffe: three killed, one wounded, three missing.[37] A member of the French resistance movement who had participated in the previous reconnaissance in Bruneval was subsequently captured and executed by the Germans. A Frenchman and his fiancée were deported to concentration camps in Germany for providing help to surviving British paratroopers in their attempt to return to the UK.[38]
Aftermath
[edit]The success of the raid against the Bruneval installation had two important effects. First, a successful raid against German-occupied territory was a welcome morale boost for the British public, and featured prominently in the British media for several weeks afterwards.[39] The British Prime Minister, Winston Churchill, took a personal interest in the operation, and on 3 March assembled the War Cabinet to hear from Frost and several other officers who had participated in it. Several medals were awarded as a result.
On 15 May 1942 a special supplement to the London Gazette carried the announcement of 19 decorations; Frost was awarded the Military Cross (MC), Cook the Distinguished Service Cross (DSC) and Cox the Military Medal (MM); there were two other DSCs, two Distinguished Service Medals (DSM), one other MC, two further MMs and nine Mentions in Despatches (MiD).[40] Wing Commander Pickard was also subsequently awarded a bar to his Distinguished Service Order, on 26 May.[41][42] The success of the raid also prompted the War Office to expand the existing British airborne forces, setting up the Airborne Forces Depot and Battle School in Derbyshire in April 1942, and creating the Parachute Regiment as well as converting a number of infantry battalions to airborne battalions in August 1942.[43]
The second and most important result of the raid was the technical knowledge that British scientists gained. Examination of the components of the radar array showed that it was of a modular design that aided maintenance and made fixing faults far simpler than on similar British radar models. This was confirmed during the interrogation of the captured German technician, who proved to be less well trained than his British counterparts.[44][45]
Examination of the radar array also allowed British scientists to conclude that they would have to deploy a countermeasure that had recently been developed, code-named Window. Examination of the Würzburg array showed that it could be tuned to a wide range of frequencies, making it difficult to jam by the conventional means used by the British during the early years of the conflict. Thus Window would have to be deployed against German radars.[46] The effectiveness of Window against Würzburg radar arrays was confirmed by a raid conducted by RAF Bomber Command on 24 July 1943 against Hamburg (Operation Gomorrah); the bombers used Window, all of the radar arrays in Hamburg were blinded and their operators confused, unable to distinguish between the radar signature of a real bomber and several pieces of Window giving off a similar signature.[47][48] Based on what was learned in the raid, a tunable jammer aimed specifically at Würzburg (Carpet) would later be deployed, hampering German efforts to adapt to Window.[49]
-
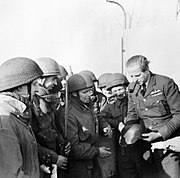
Pickard examines a German helmet taken after the raid
-
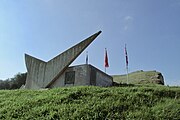
Biting memorial at Bruneval
-
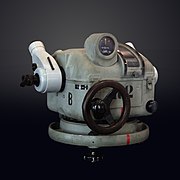
Flak pointing system captured at Bruneval and now on display at the Musée de l'Armée in Paris
An unexpected bonus of the Bruneval raid was the Germans' efforts to improve defences at Würzburg stations and prevent similar attacks. The radars were surrounded by rings of barbed wire which increased their visibility from the air, making them easier to attack prior to Operation Overlord.[50] The Telecommunications Research Establishment, where much of the Bruneval equipment was analysed and where British radar systems were designed and tested, was moved further inland from Swanage on the southern coast of England to Malvern, to ensure that it would not become the target of a reprisal raid by German airborne forces.[51] The original model of the area around the radar station, used to brief troops taking part in the assault, is preserved in the Parachute Regiment and Airborne Forces Museum, at the Imperial War Museum Duxford.[52]
See also
[edit]Notes
[edit]- ^ Frost, p. 46.
- ^ Millar, p. 156.
- ^ a b c Harclerode, p. 210.
- ^ Frost, p. 59.
- ^ Millar, p. 181.
- ^ Millar, p. 187.
- ^ Churchill, Winston. The Hinge of Fate. Houghton Mifflin, 1950. 278.
- ^ Millar, pp. 2–3.
- ^ Cornwell, p. 262.
- ^ Cornwell, p. 267.
- ^ Cornwell, p. 268.
- ^ Jones, p. 192.
- ^ Cornwell, pp. 273–274.
- ^ a b Cornwell, p. 274.
- ^ a b c Cornwell, p. 275.
- ^ a b Millar, p. 3.
- ^ a b Harclerode, p. 208.
- ^ a b Millar, p. 4.
- ^ Otway, p. 65.
- ^ a b Otway, p. 66.
- ^ Harclerode, pp. 208–209.
- ^ a b c d Harclerode, p. 209.
- ^ Jones, p. 239.
- ^ Chappell, p. 27.
- ^ a b Otway, p. 67.
- ^ Millar, pp. 18–19.
- ^ Jones, p. 238.
- ^ "1st Air Troop RE | ParaData". www.paradata.org.uk.
- ^ Jones, pp. 236–237.
- ^ a b c Otway, p. 68.
- ^ Harclerode, pp. 209–210.
- ^ a b c Harclerode, p. 212.
- ^ Otway, pp. 68–69.
- ^ Harclerode, pp. 212–213.
- ^ a b Otway, p. 69.
- ^ Kronborg, p. 171.
- ^ Kronborg, pp. 178–184.
- ^ Kronborg, p. 183.
- ^ Harclerode, p. 214.
- ^ "No. 35558". The London Gazette (Supplement). 15 May 1942. pp. 2111–2112.
- ^ Otway, p. 70.
- ^ "No. 35574". The London Gazette (Supplement). 22 May 1942. p. 2289.
- ^ Harclerode, p. 218.
- ^ Bodanis, p. 142.
- ^ Jones, p. 244.
- ^ Millar, p. 191.
- ^ Johnson, p. 116.
- ^ Millar, p. 195.
- ^ "Biting back". Key Military. 19 January 2022.
- ^ Millar, p. 190.
- ^ Jones, p. 247.
- ^ "Airborne Assault, Museum of the Parachute Regiment and Airborne Forces". Army Museums Ogilby Trust. Archived from the original on 9 April 2010. Retrieved 27 August 2012.
Bibliography
[edit]- Bodanis, David (2001). Electric Universe. Crown. ISBN 1400045509.
- Chappell, Mike (1996). Army Commandos 1940–1945. Elite Series # 64. London: Osprey Publishing. ISBN 1855325799.
- Cornwell, John (2004). Hitler's Scientists: Science, War and the Devil's Pact. Penguin Books. ISBN 0140296867.
- Frost, John (1980). A Drop Too Many. Cassell. ISBN 0850529271.
- Harclerode, Peter (2005). Wings Of War – Airborne Warfare 1918–1945. Weidenfeld & Nicolson. ISBN 0304367303.
- Johnson, Brian (1978). The Secret War. BBC. ISBN 0563174250.
- Jones, R.V. (1978). Most Secret War: British Scientific Intelligence, 1939–1945. Hamish Hamilton. ISBN 0241897467.
- Millar, George (1975). The Bruneval Raid. Doubleday & Company, Inc. ISBN 0385095422.
- Otway, Terence (1990). The Second World War 1939–1945 Army – Airborne Forces. Imperial War Museum. ISBN 0901627577.
- Kronborg, Ove C. (2017). De stjal Hitlers hemmelighed (in Danish). Forlaget Als. ISBN 9788799675494.


